How to edit content on a Webflow website?


Two types of content
A Webflow site has two types of content: static and CMS content.
Static content is the text, images, and other elements on individual pages — for example the homepage headline, contact details, or a service description.
CMS content is recurring content with a consistent structure — blog posts, case studies, team profiles, events. The same structure and design repeats automatically every time content is added or edited.
Editing static content
Static content is edited directly on the page in Webflow's Designer view. You double-click a text element and edit it directly — just like in a word processor.
In practice this means you can fix typos, update service descriptions, change contact details, update pricing, and so on.
To swap an image, click the image element and select a new one. Images are uploaded directly from your computer or from previously uploaded files (Assets).
Any element that gets a blue border when you hover over it with your mouse can be edited.
You see the changes immediately on the page, exactly as they'll appear to real visitors. When you're happy, you publish the changes with one click.
Editing CMS content
CMS content can be edited in two ways.
You can edit directly on the page. When you've opened a CMS collection or an individual CMS page in the Designer, you can click on the content and edit it directly — without having to jump to a separate view.
You can also edit through the CMS panel. The Designer has a separate CMS panel where you can see all your collections — blog posts, case studies, team profiles, and so on.
You open an individual blog post or case study, fill in or edit the fields — title, text, image, date, etc. The change updates automatically everywhere that content appears on the site and in menus.

Adding a new blog post or case study also happens through the CMS panel — you click "Add new (blog post)", fill in the fields, and publish.
The blog's design stays consistent regardless of who adds content and when.
A couple of things about publishing
Webflow offers different ways to manage how new content gets published.
Publish now pushes your changes live immediately for everyone to see.

Publishing queue (Queue for next site publish) means you can mark a blog post or other CMS content to wait in a queue — it gets published with the next full site publish. A handy option if you want to prepare several pieces of content at once.
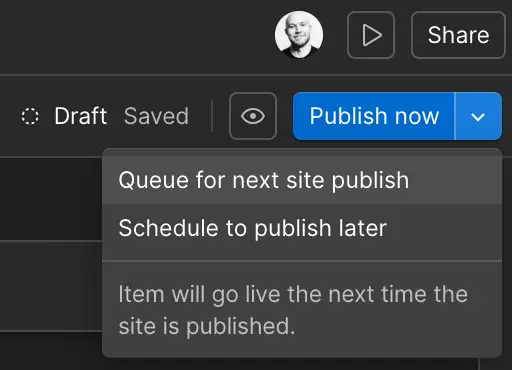
Note: if you've edited CMS content without putting it in the publishing queue, Publish now won't publish it — it sits quietly waiting until you either publish it directly (Publish now) or add it to the queue.

Scheduled publishing (Schedule for publish later) lets a new blog post go live automatically on a specific date and time. You write the article, set the publish time, and don't need to remember to press the button yourself.
Note: scheduled publishing only works for content that has never been published before, and is not available on the Basic plan.
Staging domain is a preview address where you can see your changes in a real browser before they go live on the public site. Especially useful when you want to check how a new page or change actually looks — or ask someone else to review it before publishing.
Staging domain → www.example.webflow.io
Live public domain → www.example.com

Remember to select in the Publish menu whether you want to publish to staging, to your live domain, or to both.
What if you want to change the design?
Updating content is something you can do independently, but larger design changes are a different matter.
Changing the navigation structure, adding animations, or making broader visual updates requires more advanced Webflow knowledge — in practice, a developer.
Building new page templates from scratch also requires a developer. But if the templates are already built, a marketer or content producer can create new landing pages and campaign pages independently — without a developer and without the design suffering.
Read more about page templates and components in this blog post!
Most companies don't need major design changes very often. In day-to-day life, most of the work involves updating text, images, and new content — and that you can do on your own.
Who can edit content?
Webflow has different roles for different needs.
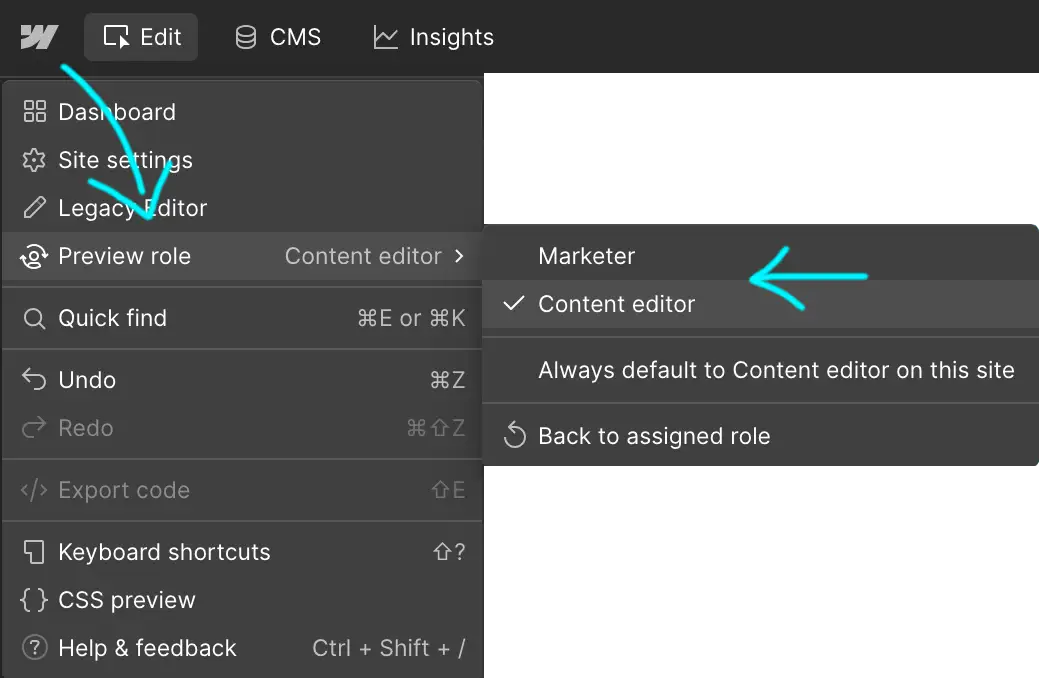
A Marketer can build new pages using ready-made templates and components, and edit all content.
A Content Editor can edit text, images, and CMS content.
A Reviewer can view the site and leave comments.
In practice this means a content producer can independently update page texts, images, links, blog posts, news, product descriptions, and so on — without needing to ask a developer for help.
Important: always make sure you're editing content in the right role. Choose any role other than Design — in Design mode it's possible to accidentally make structural changes that affect the site's layout. In content roles this risk simply doesn't exist.

Is it difficult?
Webflow's editing view (Designer) takes a little getting used to. It's not quite as straightforward as writing in Word. But once the basic logic is clear — static vs. CMS, editing directly on the page vs. filling in fields — the everyday tasks flow quickly without outside help.
I haven't met a client yet who couldn't learn the most common content edits in about a 15-minute walkthrough.
I always build sites so that my clients can manage independently after a quick briefing — and I also make a short 5-minute video guide specifically about editing the content on their own site.
No need to call me every time something needs updating.
One reminder that can't be stressed enough: always edit content in a role other than Design. In Design mode the site's structure is open to edits — and accidents can happen.
Like what you read?
You can mark me as a favorite source in Google, so you'll find yourself back to my content again!
(Also, we can reduce some AI-slop in the search results)